I have a new blog! Please visit and follow it over here: Needle vs Thread.
I will be posting from there now on!
Thursday, January 27, 2011

Friday, October 22, 2010
Not by halves!
It turns out I don't do things by halves. In the last 5 weeks I've moved house and had major jaw surgery! So if you're wondering why I've been a little quiet, that might help explain it?
The house move was as easy as it could possibly be. I moved 7 houses from where I was. But it still meant packing every possession and cleaning, cleaning and more cleaning. Settling in has been much easier than last time though.
2 weeks after I moved, and 3 weeks and 1 day ago was my surgery. I had a very bad underbite (ie my bottom teeth were in front of my top teeth - by about 1cm), and after 4.5 years of braces to prepare, I had both my bottom and top jaws moved, in what is known as a bi-maxillary osteotomy.
Due to some concerns by my surgeon about possible excessive bleeding and a few other things, I didn't know when I went into surgery whether I'd come out with anything having been done. We had 3 different plans. The first was to move my bottom jaw back. If that was tricky, they'd stop there. If they drilled a hole and blood squirted across the room, they'd stop there and nothing would be done. If the bottom jaw went as per usual, they'd think about doing the top one on the spot. So it was all a bit unknown, but I woke up 3 hours after they put me under to be told by my brilliant surgeon that they'd done both jaws and all went well.
Recovery was bad but not as bad as I'd expected. The surgery was on a Thursday morning and I went home on the Sunday morning. The only downside of going home so soon was a serious drop in the amount of painkillers I was getting. But I got through that and am healing well now. I've had a checkup with the surgeon and orthodontist and they are all thrilled (as am I!).
Now I just need to be patient. I'm not allowed to chew for another 3 weeks while the bones heal. My face is swollen and uncomfortable but it isn't really too painful any more. The main pain comes from the evil elastics on my braces. They're used to retrain the muscles of my jaw and also to continue moving my teeth. I'll need braces for a little while yet just to fine tune my bite. Hopefully by the middle of next year they'll be off and I can get on with life with a perfect bite for the first time!
Oh and I have 6 plates and 20 screws in my head!

The house move was as easy as it could possibly be. I moved 7 houses from where I was. But it still meant packing every possession and cleaning, cleaning and more cleaning. Settling in has been much easier than last time though.
2 weeks after I moved, and 3 weeks and 1 day ago was my surgery. I had a very bad underbite (ie my bottom teeth were in front of my top teeth - by about 1cm), and after 4.5 years of braces to prepare, I had both my bottom and top jaws moved, in what is known as a bi-maxillary osteotomy.
Due to some concerns by my surgeon about possible excessive bleeding and a few other things, I didn't know when I went into surgery whether I'd come out with anything having been done. We had 3 different plans. The first was to move my bottom jaw back. If that was tricky, they'd stop there. If they drilled a hole and blood squirted across the room, they'd stop there and nothing would be done. If the bottom jaw went as per usual, they'd think about doing the top one on the spot. So it was all a bit unknown, but I woke up 3 hours after they put me under to be told by my brilliant surgeon that they'd done both jaws and all went well.
Recovery was bad but not as bad as I'd expected. The surgery was on a Thursday morning and I went home on the Sunday morning. The only downside of going home so soon was a serious drop in the amount of painkillers I was getting. But I got through that and am healing well now. I've had a checkup with the surgeon and orthodontist and they are all thrilled (as am I!).
Now I just need to be patient. I'm not allowed to chew for another 3 weeks while the bones heal. My face is swollen and uncomfortable but it isn't really too painful any more. The main pain comes from the evil elastics on my braces. They're used to retrain the muscles of my jaw and also to continue moving my teeth. I'll need braces for a little while yet just to fine tune my bite. Hopefully by the middle of next year they'll be off and I can get on with life with a perfect bite for the first time!
Oh and I have 6 plates and 20 screws in my head!
Tuesday, August 10, 2010
Hide & Seek Market
In less than two weeks time, I'll be at the new Hide & Seek Market in The Hills District of Sydney. I'd love you to come and visit!

Date: Sunday 22nd August
Time: 10am - 2pm
Location: Wrights Rd Community Centre, Kellyville
More info: http://www.hideandseekmarket.com.au
And if you go over here, you can read an interview I did!
It should be a great day and I'm really looking forward to it!
Date: Sunday 22nd August
Time: 10am - 2pm
Location: Wrights Rd Community Centre, Kellyville
More info: http://www.hideandseekmarket.com.au
And if you go over here, you can read an interview I did!
It should be a great day and I'm really looking forward to it!
Tuesday, August 3, 2010
Pick me! Pick me!
I wrote a little Pattern Review the other day. And besides wanting people to know that Nikki makes fabulous patterns, there was a motive behind doing it. There's a competition! If you liked my review and purse, I'd love it if you could vote for me over here. A little bit of good luck would be very welcome right about now! And if you do vote for me - thank you!
Saturday, July 31, 2010
Fail...
Ok people, I need help. What do YOU do when you seem to be a on a run of failed projects? It's been a week now and there has been very very little success and a lot of screw ups. A week doesn't sound like long, but when you're trying to make this your job, a week of no productivity is bad! New products aren't working and even very slight (ie different fabric type) variations on old products aren't working. I'm not sure I can face another failed project and another day down the drain, so, help! Please!
Tuesday, July 27, 2010
Pattern review: Nicole Mallalieu Design - 150mm Purse Frame Kit
1. Name of the pattern
150mm Purse Frame Kit
2. Difficulty rating
A beginner really could do this because the actual sewing is very simple (mostly straight lines) and the instructions are incredibly detailed.
3. Were the instructions easy to follow? (And did you learn anything new from them?)
Nikki's instructions are the best I've seen. I'm normally terrible at following patterns/instructions - they always seem to be written in a different language, but not these ones! It really is like a sewing lesson in a kit. Lots of extra little bits of detail to help you improve your sewing techniques and I learn something from each pattern I try!
I'd tried to make frame purses without Nikki's patterns and they were one of the most frustrating things I've ever attempted! Nikki's work EVERY SINGLE TIME.
4. Did the finished project look like the one on the pattern cover or did you 'tweak' it? (If tweaked, what did you do change?)
The basic shape is exactly like the pattern cover. My only tweaks were extra embellishment in the form of the fabric flower and the beaded detailing.
5. Were you happy with the finished project?
Absolutely! Every purse I've made from this pattern has been a success!
6. What did you particularly like or dislike about the pattern?
I love that you learn to make a purse 'properly'. All the edges are finished - no raw edges shoved into the frame like other pattern makers suggest. The purse is glued and crimped into the frame unlike so many that I've seen. I also love the general shape of the purse and the fact that extra attention is paid to things like interfacing to make a nice professional finish.
7. Would you make this pattern again? Would you recommend it to others?
I've made it many, many times and will continue to do so! And I would absolutely recommend it to others.


150mm Purse Frame Kit
2. Difficulty rating
A beginner really could do this because the actual sewing is very simple (mostly straight lines) and the instructions are incredibly detailed.
3. Were the instructions easy to follow? (And did you learn anything new from them?)
Nikki's instructions are the best I've seen. I'm normally terrible at following patterns/instructions - they always seem to be written in a different language, but not these ones! It really is like a sewing lesson in a kit. Lots of extra little bits of detail to help you improve your sewing techniques and I learn something from each pattern I try!
I'd tried to make frame purses without Nikki's patterns and they were one of the most frustrating things I've ever attempted! Nikki's work EVERY SINGLE TIME.
4. Did the finished project look like the one on the pattern cover or did you 'tweak' it? (If tweaked, what did you do change?)
The basic shape is exactly like the pattern cover. My only tweaks were extra embellishment in the form of the fabric flower and the beaded detailing.
5. Were you happy with the finished project?
Absolutely! Every purse I've made from this pattern has been a success!
6. What did you particularly like or dislike about the pattern?
I love that you learn to make a purse 'properly'. All the edges are finished - no raw edges shoved into the frame like other pattern makers suggest. The purse is glued and crimped into the frame unlike so many that I've seen. I also love the general shape of the purse and the fact that extra attention is paid to things like interfacing to make a nice professional finish.
7. Would you make this pattern again? Would you recommend it to others?
I've made it many, many times and will continue to do so! And I would absolutely recommend it to others.
Sunday, July 25, 2010
What I am not...
Is a quilter!
I have a baby niece due any day now, so I got it into my head that I wanted to make her a quilt. I've made one before (although I didn't quite finish it) so I should have known this would be hard work. Backing it with dot minky (stretchy and slippery), didn't make the job easier! I cheated and didn't do a traditional binding - instead choosing to make a fringed type of border that will fray and soften with use. I definitely don't enjoy the quilt making process. Probably something to do with being a perfectionist and it being so difficult to wrangle a big heavy quilt and sew perfectly straight all at the same time.
I love the outcome though!


The prints are from the "What a Hoot" collection by Camelot Cottons.
I have a baby niece due any day now, so I got it into my head that I wanted to make her a quilt. I've made one before (although I didn't quite finish it) so I should have known this would be hard work. Backing it with dot minky (stretchy and slippery), didn't make the job easier! I cheated and didn't do a traditional binding - instead choosing to make a fringed type of border that will fray and soften with use. I definitely don't enjoy the quilt making process. Probably something to do with being a perfectionist and it being so difficult to wrangle a big heavy quilt and sew perfectly straight all at the same time.
I love the outcome though!
The prints are from the "What a Hoot" collection by Camelot Cottons.
Tuesday, June 29, 2010
24 hour sale on hand embroidered clutches!
Just a really quick note to mention my really quick sale! 20% off all of the hand embroidered Adorn clutches in my Plus 1 Design Etsy store. The sale ends at 5.30pm Sydney time. While you're over there, you might notice a small announcement too!
Sunday, May 30, 2010
Studio rearrangement
This week my studio got rearranged! Previously it was cramped, and with the addition of the ironing press and overlocker, it was getting difficult to work in there. So a trip to Ikea and I'm all set!
New shelves and containers (from my kitchen actually) to organise all the little things! And a home for the overlocker.

And another new shelf for the ironing press and other assorted bits.

Now the only problem here is the ironing board, which no matter where I put it, is in the way. It's currently stashed under the cutting table as you can see, but that's not practical. Think I'm just going to have to take it out and move it around everytime it's in the way. It's a million years old and weighs a tonne, but what else to do?!
Oh and trying to add a little life and colour in there too... I love indoor plants - especially these babies that I've grown myself!

PS. Please just pretend that I've emptied the recycling bin and vacuumed the floor!
New shelves and containers (from my kitchen actually) to organise all the little things! And a home for the overlocker.
And another new shelf for the ironing press and other assorted bits.
Now the only problem here is the ironing board, which no matter where I put it, is in the way. It's currently stashed under the cutting table as you can see, but that's not practical. Think I'm just going to have to take it out and move it around everytime it's in the way. It's a million years old and weighs a tonne, but what else to do?!
Oh and trying to add a little life and colour in there too... I love indoor plants - especially these babies that I've grown myself!
PS. Please just pretend that I've emptied the recycling bin and vacuumed the floor!
Thursday, May 27, 2010
Who knew that $12.50 could buy love?!
Despite being one of the busiest people I know, Nikki is amazingly generous when it comes to giving advice and sharing her knowledge. When she told me a few weeks ago to try to find a second-hand Elna Press because it would be a lifesaver when it comes to fusing interfacing to fabric, I figured that this was something I definitely needed to do. The timing couldn't have been better cause when I looked on ebay, there was one - local pickup only, just 15 minutes down the road. Now the crazy thing is that I managed to get it for $12.50. Yup - you read right - $12.50.
I picked it up this morning and I'm in love already. A little bit of elbow grease (and some bicarb and vinegar) was needed to clean the plate, a $5 ironing board cover for the base, and we're in business!

Oh and fusing this interfacing takes approximately 10 seconds!
The ebay equipment love doesn't stop there either! In the last couple of months I've also managed to get my hands on a second-hand overlocker, and a brand new electric rotary cutter. All of this has cost me about $300 and means I have all the essential appliances for my studio!
And speaking of the studio - these recent acquisitions mean that I need to rearrange it, so I'm in the midst of doing that now. If I can get some decent photos when I'm done, I'll post them here. Even though it looks like a bomb has hit it at the moment, it's already looking bigger and more user friendly!
I picked it up this morning and I'm in love already. A little bit of elbow grease (and some bicarb and vinegar) was needed to clean the plate, a $5 ironing board cover for the base, and we're in business!
Oh and fusing this interfacing takes approximately 10 seconds!
The ebay equipment love doesn't stop there either! In the last couple of months I've also managed to get my hands on a second-hand overlocker, and a brand new electric rotary cutter. All of this has cost me about $300 and means I have all the essential appliances for my studio!
And speaking of the studio - these recent acquisitions mean that I need to rearrange it, so I'm in the midst of doing that now. If I can get some decent photos when I'm done, I'll post them here. Even though it looks like a bomb has hit it at the moment, it's already looking bigger and more user friendly!
Sunday, May 23, 2010
Preserves
I sold these two pieces outside of Etsy and realised that they aren't really preserved anywhere anymore, so I thought I'd blog about them. I have a feeling I've mentioned the first one before:
Such a pretty one off piece! 3 days of work... Luckily it's gone to my next door neighbour so I can visit it if I need to!
And a piece that few people would have seen:

This was the first of my new Inessence range of bags etc made from natural, eco friendly, reclaimed and vintage fabrics. The outer is a very nice recycled hemp/organic cotton blend, with a scrap fabric applique. It's lined with a vintage fabric. I'm looking forward to making more like this!
Such a pretty one off piece! 3 days of work... Luckily it's gone to my next door neighbour so I can visit it if I need to!
And a piece that few people would have seen:
This was the first of my new Inessence range of bags etc made from natural, eco friendly, reclaimed and vintage fabrics. The outer is a very nice recycled hemp/organic cotton blend, with a scrap fabric applique. It's lined with a vintage fabric. I'm looking forward to making more like this!
Friday, May 14, 2010
Friday feature
I'm going to try to do a regular Friday feature post from now on... Starting today with the robot treasury I curated on Etsy!

Tuesday, May 11, 2010
I'm sorry!
Dear blog and the one person who reads my blog,
I'm sorry (again) that you have been so neglected! I am going to blame it on two things. Being busy. And that since I got my new computer, I couldn't login to flickr. So I couldn't post pics on here. And I didn't want to bore you to death with pictureless posts.
Now, I'm still busy, but I do promise to be back soon with something vaguely more entertaining!
I'm sorry (again) that you have been so neglected! I am going to blame it on two things. Being busy. And that since I got my new computer, I couldn't login to flickr. So I couldn't post pics on here. And I didn't want to bore you to death with pictureless posts.
Now, I'm still busy, but I do promise to be back soon with something vaguely more entertaining!
Saturday, February 13, 2010
Arghhhhh
Apologies again for my absence!
I would like to blame it on the curse that seems to have been placed on me. The one that involves one thing after another going wrong. One of the latest is that I managed to kill my computer almost two weeks ago. I don't recommend doing this because getting a new one is an expensive pain in the bum.
I type this from my shiny new Compaq Presario which is running the 64 bit version of Windows 7. It's the same machine that my printer refuses to install on. And the same machine that the sound is only half working on - as of yesterday. And the same machine that when I restarted it earlier tonight, changed the screen resolution all by itself. And the one that some of my software won't run on because it's too old.
Oh yeah and the apostrophe and quotation mark keys don't type apostrophes or quotation marks when you press them - they show up when you press a key afterwards. That one I can live with - now that I've worked it out.
Shiny new computers are supposed to be exciting... This one is lucky it hasn't been thrown out the window.
Due to the ever growing list of dramas I've encountered over the past 3-4 weeks, I have no new work to show you. Oh wait - I couldn't show you anyway because I can't login to my flickr account. When I try, it sends me into a crazy loop of - this is not the correct login, click here to have your login details sent to you, this is not the correct login, click here to login...
You're all totally gonna go and buy a new computer tomorrow aren't you?!
OHHHHH and I forgot - it's the same computer that didn't know it had a DVD drive/that the DVD drive didn't work on... Because it WASN'T PLUGGED IN when the machine was built. At least that was easy to fix....
I would like to blame it on the curse that seems to have been placed on me. The one that involves one thing after another going wrong. One of the latest is that I managed to kill my computer almost two weeks ago. I don't recommend doing this because getting a new one is an expensive pain in the bum.
I type this from my shiny new Compaq Presario which is running the 64 bit version of Windows 7. It's the same machine that my printer refuses to install on. And the same machine that the sound is only half working on - as of yesterday. And the same machine that when I restarted it earlier tonight, changed the screen resolution all by itself. And the one that some of my software won't run on because it's too old.
Oh yeah and the apostrophe and quotation mark keys don't type apostrophes or quotation marks when you press them - they show up when you press a key afterwards. That one I can live with - now that I've worked it out.
Shiny new computers are supposed to be exciting... This one is lucky it hasn't been thrown out the window.
Due to the ever growing list of dramas I've encountered over the past 3-4 weeks, I have no new work to show you. Oh wait - I couldn't show you anyway because I can't login to my flickr account. When I try, it sends me into a crazy loop of - this is not the correct login, click here to have your login details sent to you, this is not the correct login, click here to login...
You're all totally gonna go and buy a new computer tomorrow aren't you?!
OHHHHH and I forgot - it's the same computer that didn't know it had a DVD drive/that the DVD drive didn't work on... Because it WASN'T PLUGGED IN when the machine was built. At least that was easy to fix....
Friday, December 4, 2009
Hello! I am still alive!
Ahhhhh I've been neglecting this blog terribly lately. I have an excuse, really! I've been busy.
I underestimated how much time it would take to prepare for regular markets. And when I say regular, I've only done three of them and two of them were a month apart. Next weekend is the last one for the year. It has been fun! But yep, like I said, I underestimated how much time it would take to prepare. I've developed some new products for the markets which has been fun. Some of them will make their way into my etsy shop eventually. Not all of them though. The time it takes to photograph and list and the listing fees involved, mean that some really aren't viable products to sell online.
And otherwise I have been busy completing the most complex bag I've ever made! I'm not sure that the photos really illustrate the detail and planning that went into this. My customer had a very specific list of needs and I think and hope that I've covered all of them with this one. It is a variation on the nappy bag concept - two smaller bags that join together to create one large bag. It took 2 months to plan it and a month to sew it together (there were a few stops and starts due to the laptop it was based around dying and needing to be changed to an entirely different one).

I learned new skills and pretty much had to pull out every trick in the book to get this one done! There are magnetic snaps, zippers, d-rings, purse feet, rivets, bias binding, PVC overlays, pockets with gussets, 3D pockets with dividers, a shoulder pad on the strap and a grand total of 18 press studs. Oh wait, 19 press studs if you count the one on the laptop sleeve too!

Oh and did I mention that the print is from Liberty of London? Talk about nerve wracking!
I underestimated how much time it would take to prepare for regular markets. And when I say regular, I've only done three of them and two of them were a month apart. Next weekend is the last one for the year. It has been fun! But yep, like I said, I underestimated how much time it would take to prepare. I've developed some new products for the markets which has been fun. Some of them will make their way into my etsy shop eventually. Not all of them though. The time it takes to photograph and list and the listing fees involved, mean that some really aren't viable products to sell online.
And otherwise I have been busy completing the most complex bag I've ever made! I'm not sure that the photos really illustrate the detail and planning that went into this. My customer had a very specific list of needs and I think and hope that I've covered all of them with this one. It is a variation on the nappy bag concept - two smaller bags that join together to create one large bag. It took 2 months to plan it and a month to sew it together (there were a few stops and starts due to the laptop it was based around dying and needing to be changed to an entirely different one).
I learned new skills and pretty much had to pull out every trick in the book to get this one done! There are magnetic snaps, zippers, d-rings, purse feet, rivets, bias binding, PVC overlays, pockets with gussets, 3D pockets with dividers, a shoulder pad on the strap and a grand total of 18 press studs. Oh wait, 19 press studs if you count the one on the laptop sleeve too!
Oh and did I mention that the print is from Liberty of London? Talk about nerve wracking!
Tuesday, November 3, 2009
I'm a guest curator!
This is so exciting for me! I'm a guest curator at Etsy Stalker! The lovely ladies asked me a few weeks ago if I would like to curate a Spring Bags and Purses Exhibit and I jumped at the chance. It was a really interesting challenge. I had some very specific criteria in my head, so that helped narrow the list down, but it was still difficult to choose from all the beautiful work on Etsy.
I hope you go and visit the exhibit and enjoy my choices!
If I had to put one of my pieces in there, I don't think I could go past this one.
I hope you go and visit the exhibit and enjoy my choices!
If I had to put one of my pieces in there, I don't think I could go past this one.
Tuesday, October 13, 2009
Shortening nylon zippers - tutorial!
Zips too long? Here's my method for shortening them the neat way.
One of the most common problems I have is not having the right sized/colour zipper for the job. It doesn't seem to matter how many I have, I'm always missing the one I need! Sometimes you can get away with just cutting the end of the zip off. But sometimes, you need the metal stops on the ends, and you need to be able to fold that little bit of zipper tape on the end over to get a neat finish - like on the top of zippered coin pouches etc. So having the right length zip can be crucial.
I need to make some teeny tiny zippered pouches at the moment and don't have the right length zips, so I spent a little time today working out how to shorten them and it's really easy once you know the tricks.
First get a large needle, or something sharp and pointy, and lift up the prongs on the back of the big metal stop at the end of the zip. Once they're up a bit, you can finish straightening them with your needle nosed pliers and then pull it off. Don't lose it!

Then just measure and mark your zipper at the required length. For me this time it is 10cm.

Take the metal stop that you just took off, and put it back on where you just made the mark. A gentle tap with a hammer works a treat for flattening the prongs.

Then cut the excess zipper off, leaving about 1.5cm between the stop and where you cut. Treat the end of the zipper tape with some fray stop, or cut with pinking shears or whatever you like to stop it fraying.

Then separate the excess zipper.

What you need to do next is remove the nylon coil. It is threaded through the zipper tape, so it is not just a matter of pulling the end and it unraveling. It won't go further than a few coils this way, and gets really messy.
So take your trusty unpicker and push it through the middle of the first few coils and cut them. Keep doing this until you get to the metal stop.

Then grab your needle nosed pliers or some tweezers and pull the little bits of cut coil out. Repeat on the other side. You may need to snip the end off the very last one on each side to keep it neat and not spikey.

And voila - you're finished! And have a nice neat** zipper end and a zipper just the length you needed!

**This one is not as neat as my first one, but those end bits will be folded over and sewn under fabric so it is ok!
One of the most common problems I have is not having the right sized/colour zipper for the job. It doesn't seem to matter how many I have, I'm always missing the one I need! Sometimes you can get away with just cutting the end of the zip off. But sometimes, you need the metal stops on the ends, and you need to be able to fold that little bit of zipper tape on the end over to get a neat finish - like on the top of zippered coin pouches etc. So having the right length zip can be crucial.
I need to make some teeny tiny zippered pouches at the moment and don't have the right length zips, so I spent a little time today working out how to shorten them and it's really easy once you know the tricks.
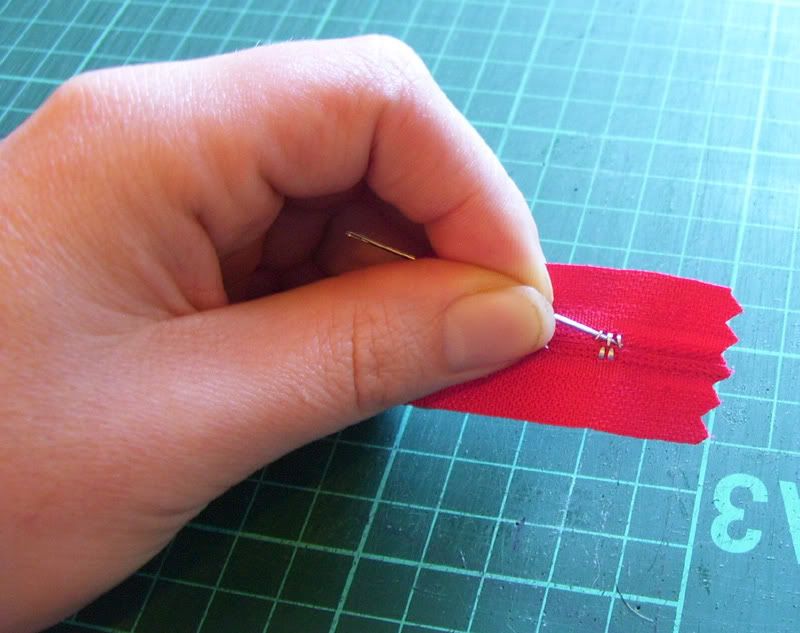
First get a large needle, or something sharp and pointy, and lift up the prongs on the back of the big metal stop at the end of the zip. Once they're up a bit, you can finish straightening them with your needle nosed pliers and then pull it off. Don't lose it!
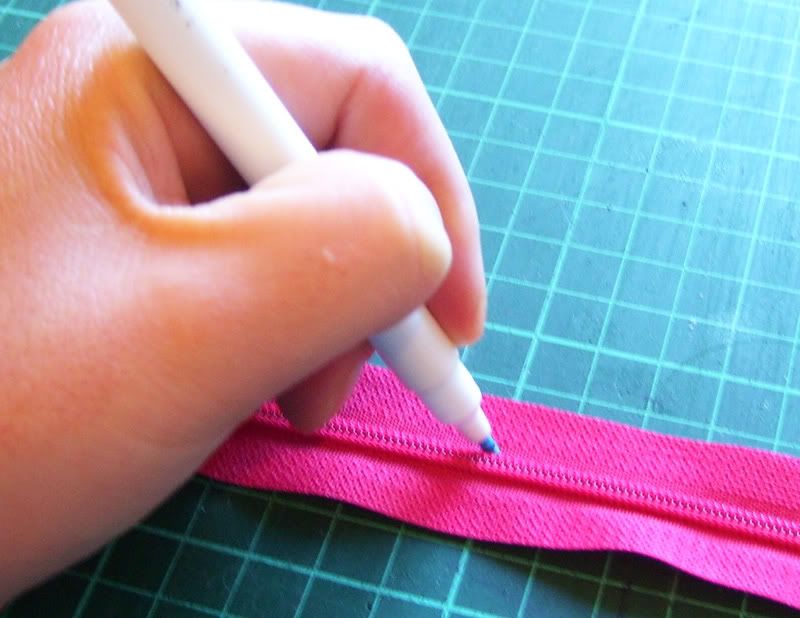
Then just measure and mark your zipper at the required length. For me this time it is 10cm.
Take the metal stop that you just took off, and put it back on where you just made the mark. A gentle tap with a hammer works a treat for flattening the prongs.

Then cut the excess zipper off, leaving about 1.5cm between the stop and where you cut. Treat the end of the zipper tape with some fray stop, or cut with pinking shears or whatever you like to stop it fraying.

Then separate the excess zipper.

What you need to do next is remove the nylon coil. It is threaded through the zipper tape, so it is not just a matter of pulling the end and it unraveling. It won't go further than a few coils this way, and gets really messy.
So take your trusty unpicker and push it through the middle of the first few coils and cut them. Keep doing this until you get to the metal stop.

Then grab your needle nosed pliers or some tweezers and pull the little bits of cut coil out. Repeat on the other side. You may need to snip the end off the very last one on each side to keep it neat and not spikey.

And voila - you're finished! And have a nice neat** zipper end and a zipper just the length you needed!

**This one is not as neat as my first one, but those end bits will be folded over and sewn under fabric so it is ok!
New adventures and other little things
So firstly, the Mountain Makers exhibition was awesome! Lots of sales, met lots of people, had lots of fun! Can't wait to do it again (when we can talk Tess into organising another one). You can see lots of photos of how pretty it was if you go and look at Mandy's flickr set.
It was so much fun that I decided to do one of the local markets. So my first market all by myself with no hand holding was this past Saturday at the Ivy Market in Springwood. I'm pretty happy with my first one. Lessons learned, things sold, lots of smiling faces. I'm especially happy with my display:

I'm still working out whether I can go back to do the next one, but the chances are pretty high at this stage.
At the market I debuted a new product which I'm really excited about! I've wanted to make wrist cuffs for ages, but it has taken me awhile to settle on a style and design. Finally it is done! Here is a sneak peek:


I'll be listing them in my Etsy shop in the next few days. Just got to get a chance to finish photographing them... I'm juggling too many things at once at the moment.
It was so much fun that I decided to do one of the local markets. So my first market all by myself with no hand holding was this past Saturday at the Ivy Market in Springwood. I'm pretty happy with my first one. Lessons learned, things sold, lots of smiling faces. I'm especially happy with my display:
I'm still working out whether I can go back to do the next one, but the chances are pretty high at this stage.
At the market I debuted a new product which I'm really excited about! I've wanted to make wrist cuffs for ages, but it has taken me awhile to settle on a style and design. Finally it is done! Here is a sneak peek:
I'll be listing them in my Etsy shop in the next few days. Just got to get a chance to finish photographing them... I'm juggling too many things at once at the moment.
Friday, September 25, 2009
Exhausted but very happy
I just not long ago got home from setting up the exhibition. The hall looks amazing! So much beautiful stuff. It was hard to imagine until it was done, but it's fantastic. Here's hoping all the people who said they would come, do!
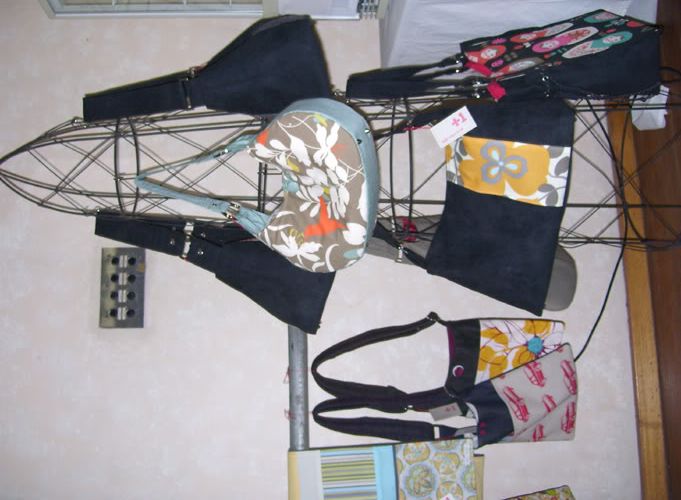
I meant to take more photos, but didn't manage to remember to do so on account of the very long day it's been. But here are some very average photos of my display (which I am very happy with and have to say a big thank you to Carley for all the help with!).


I meant to take more photos, but didn't manage to remember to do so on account of the very long day it's been. But here are some very average photos of my display (which I am very happy with and have to say a big thank you to Carley for all the help with!).
Thursday, September 24, 2009
Not long now!
This time tomorrow, I'm hoping to be finished setting up my display at the Mountain Makers exhibition! The show opens on Saturday morning and I'm feeling a mix of nerves and excitement. I have almost finished* making things for it... Tomorrow is going to be busy. I have to finish tagging/labeling everything (ummm after I make more tags) and then work out how to display everything. And how to fit it in the car to get it there.
I can't wait to see everyone's stuff all set up. It should be a really fantastic show and hopefully I see some of you there!
*As much as you can ever be finished getting ready for these things!
I can't wait to see everyone's stuff all set up. It should be a really fantastic show and hopefully I see some of you there!
*As much as you can ever be finished getting ready for these things!
Subscribe to:
Posts (Atom)


